Its not a goblet, till you’ve connected the stem
Hello, through the magic of blogging we’ll pick up this week with connecting the two pieces that were thrown last week to make a goblet. I’m happy to say that filming the process went as normal and there will be corresponding video to the advice given below. So huzzah!
In last weeks blog, I discussed the throwing aspect of making a goblet. It should be noted that before I trimmed and joined the two pieces I threw, the pieces were allowed to dry slowly for about a week. Now drying times are never certain and I’ve discussed them before in this blog, but let me go over them again.
There is never a set amount of days that can be prescribed for drying. “How long will it take to dry,” is a common question I am asked routinely. The answer is always, “It depends.” At the studio I am working out of, almost nothing is drying right now. It could be that its very damp in the basement, the weather is humid (I do live and work on Long Island) or that I’ve just wrapped things too tightly. What I will say is that one piece that wasn’t wrapped as tightly as the others was the stem to this goblet and it was far dryer than anything else on my shelf.
As I’ve said in the past, you want to wrap your pieces in accord with when you KNOW you’ll be back to work on them. Its always better to over wrap and have wet work than be too loose and everything is dried out.
Also if you know you have a situation like me where nothing is drying, you can afford to be a little looser with your wrapping, but only if you re able to check on your work in a day or two at the most.
So with the topic of drying discussed, you want both pieces to be the typical leather hard before you work on them. You won’t need any special tool to join these pieces together, but this is what I used specifically.: my double loop trim tool, pin tool, wood knife/modeling tool, scrub pad and mudtools sponge.
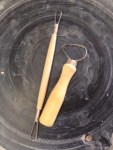
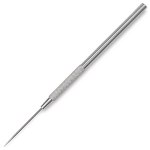
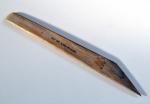


Now if you don’t have these tools specifically, variations on them are fine. Essentially, you need something to trim with, something to score with aand tools to blend with once the joint has been made. You may also want to use a brush to apply slip or water or you can use your finger like some times I do.
You want to begin by rounding out your bowl or tall cylinder. You don’t need a foot for this, so just make it nice and smooth. After its smooth to your satisfaction, take the stem, place it on top and carve a line around the outside onto the bowl. This way you’ll know exactly where to carve to create a trench for the stem.
Once a trench has been made, you want to score both it and the top of the stem. Next and slip or water to one section and place the stem into the trench, than secure it with a small coil around the joint. You’ll want to start blending the coil with your modeling tool/wood knife, first up and down and than removing the excess by blending horizontally.
When that is accomplished, blend it again with your scrub pad and than again with your sponge. As with all connections you want them to look absolutely seamless, people should believe it is one piece of clay at first.
Finally, you want to clean up the base of the stem a little. You can do so easily with you pin tool of a knife and your scrub pad and sponge.
Congratulations, you’ve made a goblet, but before you pop of the champagne make sure you cover it well and let it dry slowly. You want to give that join every chance of not cracking open. Also, you might want to fire and glaze the goblet, cause if you poor champagne into greenware its a mess.
Till next week, get into the studio and make something.
Questions on the technique, email me at sparanoarts@gmail.com, like what I’m doing feel free to join my email list and get 10% off your next purchase on my Etsy store , make sure to check you spam or gmail promotions folder for the reply email! Also, if you like my advice,I have begun filming daily pottery tips on my YouTube channel. So please subscribe!

