Trimming your f$%king bowl
Now that I’ve discussed how to throw a bowl, its time to talk trimming. In this post I’ll be discussing my method of trimming. Next week, I’ll go into trouble shooting any problems you might have when trimming a bowl.
Since trouble shooting is next week, I’ll wait to give you an example on what not to do. Instead we’ll get right to the instruction.
The tools you’ll need
I know there are potters who become trimming tool fetishists. Potters who love getting a new trimming tool and can’t wait to see what kind of cut it will make into clay and how they can use it. If this is a hobby for you and you’ve made a ton of money shorting pork belly’s on the commodities exchange and have money to burn, please by all means buy as many tools as you want. It won’t do jack shit for you, but have a good time.
However for those of us who are on a budget, are making this a second business, primary business, want to become proficient in skill, have common sense or just the adult sensibility/self control to not need to buy yourself a new shiny toy every month to make up for dad not hugging you…Here is a list of all the trimming tools you really need.
Remember a tool is only as good as the person using it. So I ask you who is the better potter, one who needs 20 tools to do a couple of things or one who needs a couple of tools to do 20 things? Pretty much everything you could possibly need to trim your pots can be found in a basic starter kit.
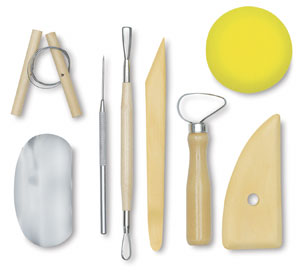
In here you”ll find:
Your loop tools (not mine and never leave them on the wheel)

Your pin tool (really never leave this on the wheel)

Your sponge (most likely the circular yellow kind, not a mud tools)

and your metal rib

The only thing not included in a standard kit is a green scrub pad, which is easily bought at any convenience/grocery store.

OK so first things first (if you’re left handed please reverse all instruction), you need to center the bowl. There are a couple of methods that I’ve heard of/seen, but none makes more sense to me than placing it as close to the center as possible. When you look down at the wheel (without a bat, because you don’t need a bat to trim) you’ll see concentric circles. Place the bowl as much in the center as you can, lord knows it took me too long to figure that one out.
Now take you index and maybe middle finger of your right hand, rest it on the splash pan and slowly let the wheel turn. Where ever you feel it knocking your finger, you need to stop the wheel and almost microscopically push it toward the center. If you push more than an eighth of an inch it might be too much. You want to repeat this process till it is touching your finger smoothly at all times.
**Note: If you get it really close to centered, you can start trimming, nothing is ever perfect. As you trim you can recenter, as you see me do in the video.**
Once centered you need to adhere the bowl to the bat. So I roll out some simple coils, usually on my knees as I sit at the wheel. I put 2 coils on either side of the bowl and push down on a diagonal angle. This makes the clay stick to both the bowl and the wheel. I do this using opposing force. So if my right hand is turning counter clockwise away from me, my left hand is turning counter clockwise toward me. This will keep the bowl from pushing forward or backward and getting off centered.
Time to trim!
I start with my large loop tool. I begin in the center holding it firmly in my right hand and extending my index finger to the top of it. I keep my left on the side of the piece gently and use my thumb as a steadying guide. I work from the center moving outward. I will continue this till everything is smooth and rounded to my satisfaction.
Next, I’ll use the corner of the flat side of my double loop tool. I’ll use it to mark 2 lines that will become the inside and outside of my foot. You can also use a pin tool to do this. If you’re really new I suggest using the pin tool to put several lines on the pot. This way you can decide where to best place your foot, especially if you’re still developing style and personal aesthetics.
Once the foot is established, I will use the round side of the loop tool to trim from the center of the bowl to the inside line. Typically I will do three passes. I’ll still have my left hand on the piece and guiding myself with my thumb. I don’t push down too hard, just enough to take up clay. Once the digging is done, I’ll smooth out the inside with the square side of the loop tool.
Moving on to the outside of the foot, I’ll again use the round side of the loop tool to round off the edge further and help make the foot pronounced. Once that is roughed out, I’ll use the flat side of the metal rib, bend it with my thumb and fingers and run it along the outside of the bowl. This smooths out and finalizes the curve.
When I am happy with the foot and curve of the bowl, I’ll use the green scrub pad (that has been sitting in a small container of water) and I’ll give the piece a quick scrub. After which I’ll smooth it down with my sponge. The piece is now trimmed. Shout out to Nadiege Choplet who taught me the metal rib/scrub/sponge technique!
That’s it, your done!! Put your name on it. However, you’re not quite ready to fire the bowl yet. As said above next week, I’ll trouble shoot some typical trimming problems and in 2 weeks I’ll go over creative option and finishing steps for your bowls.
Till then, go to the studio and make something.
Questions on the technique, email me at sparanoarts@gmail.com, like what I’m doing feel free to shop my Etsy store


Comments
One Response to “Trimming your f$%king bowl”Trackbacks
Check out what others are saying...[…] in trimming your bowls and in general I suppose. For a tutorial on bowl trimming please go to last weeks post. There are some common issues that I think everyone has when they begin trimming and some that […]
LikeLike