Carving a double wall vessel
When last I spoke about double wall vessels, it was primarily about how to make them and suggestions on what you can do with them. Suggestions are all well and good, but it occurred to me that some examples and demonstrations were in order.
So I filmed myself carving some of the double wall pieces I had made in demos for this blog as well as for my class at Island Pottery Studio in Mineola NY. They were recently keen on how to make these pieces as well.
Carving to me is best done simply. Esepcially, if you are new to it and attempting to cut out pieces from the vessel. In a previous post I discussed decorative options. Today though, I’d like to go in just a little more detail on how to do it.
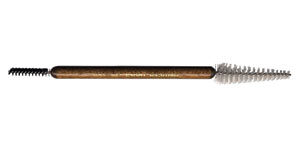
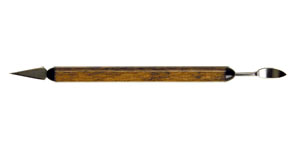
First off you’ll need a pin tool, a sharp knife of some kind (in the video I used an xacto knife) a green scrub pad, a small scrub brush and a sponge. Below are some picture examples:


First you will want to draw out a pattern using your pin tool. I recommend simple and geometric or something curvy and flowing. The key though is to make the same shape repetitively. The repetition is what creates the awe.
As your hands and skill improve you can branch out to more ornate patterns, but for now stick to the K.I.S.S. method (keep it simple stupid).
Using your pin tool first will also allow you to correct any mistakes. Think working in pencil before moving on to ink.
Once you are happy with the pattern than you will want to start carving things out. The key is to do this while the clay is just a slight bit leather hard. If its too hard this will be a nightmare and too soft will distort the shape of the piece. You need this to be in the Goldilocks zone, so to speak. As you cut away, hopefully the pieces will just pop out easily with the push of your knife. If not though, you might need to employ either your pin tool or this clean up tool (or maybe both):
I mean specifically the hooked/curved end.
Once you’ve carved and removed all of the cut out, you want to use the scrub brush to clean up the cuts. First dip (and repeat dipping) the brush in a small container of water and then just go around the inside of the cuts. When that is done, employ your scrub pad on the outside of the piece and then your sponge to smooth everything over.
Finally, you might want to use your pin tool to clean up the cut outs and remove any excess slurry. You want to maintain the integrity and cleanliness of the cuts as much as possible.
There you have it. As always below are corresponding videos to give a visual aid.
As always thanks for reading and watching the video. Please make sure to like, share and subscribe to my Youtube channel as well as join my mailing list.
Till next time, get into the studio and make something!
Questions on the technique, email me at sparanoarts@gmail.com, like what I’m doing feel free to shop my Etsy store

