Finishing steps that won’t f%&k up your pot
This will be the last post on what I would consider the essential techniques you need as a wheel thrower. Today I will be discussing how to finish a pot and take it off the wheel at the most basic level. After this, posts will be focused on making specific shapes or solving specific problems.
Removing something from the wheel is an interesting proposition. Its the simplest techniques, yet if done wrong (and believe me a lot of people do it wrong) the piece you made will be wrecked. That being said, if I’ve taught you personally either at Island Pottery or Choplet you’ll know that these techniques aren’t as physically demanding as centering, opening or even pulling a wall.
What you’ll need to finish your pot should be found in your basic pottery tool kit which looks like this:
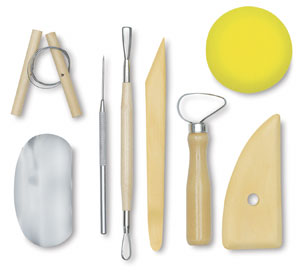
Specifically you’ll be needing the sponge, pin tool, modeling tool/wood knife and wire tool. Also in the videos below you’ll see me use a chamois cloth, which you can buy pretty easily online. It is only a small strip of cloth, so if you buy a large amount it will last you indefinitely. If you don’t want to go looking for it, you could also create a temporary one by ripping a strip of newspaper and folding it length wise a couple of times to strengthen it.

Now, as I often do, I will show a video that I DO NOT agree with in terms of technique. This is to inoculate you against bad techniques and make you question methods. For the most part I had a hard time finding bad technique videos on YouTube, a lot of them are pretty solid in how to finish a pot. I might do one or two things differently, but all in all if you see something that works for you, use it. However, I did find one that I would classify as inefficient.
So its not that is techniques are bad, but it could have been done better. I would have had my wood knife resting along the side of the wall and cut down to the bat and not have come in from the side. I would not use my finger to wipe the bottom, because in doing so you negate the under cut you made to take it off the bat. Throwing after some trimming is good, I do it all the time, his rim compression is good, removing water from the inside is good. Holding the wire tool is over explained, but not bad. Ultimately I’d say stop watching after he uses the wire tool. Everything after is kind of stupid and will fuck you up if you try it.
OK on to my technique. Below I have three YouTube videos of me finishing the same pot but all from different angles. Hopefully its comprehensive enough that you get a good grasp on what I did.
So what did I do in these video?
First I trimmed the rim using my pin tool. To do that I sliced in (NOT POKED) from the side as if I was using a knife. I kept slowly slicing until I touched my left index finger on the inside of the pot and the lifted off the strip of clay. You can see this pretty clearly in the top angle video.
Next I compressed the rim and rounded it out using the aforementioned chamois cloth. Simply get the cloth wet, and wrap it around the rim and apply gentle pressure.
After, I used my sponge to soak up all the water in the inside of the piece. This will make sure it dries evenly and doesn’t crack later.
Then I used my wood knife, held it like a knife, pushed down onto the bat and cut into the bottom of the pot. This created an undercut. I then changed my grip to holding it like a pen and trimmed away any excess. You can see that on the side angle video and a little on the front. My hand position it pretty clear on the top angle video as well.
Finally, I passed the taught wire tool under the bottom of the pot several times so it could come off the bat.
Now here is an important point!
If you are working in your private studio, leave your pieces on the bat and let them dry a bit so they are sturdy. By doing this, they will not become warped or misshapen. Just leave them alone. You can remove them when they feel good to move.
If you are in a communal studio, you don’t want to be a bat hog, so make sure you have a ware board ready. If you can, leave the pieces on the bat for the remainder of the days session. When you are cleaning up, take your pieces of the bat and onto a ware board. I recommend a couple more passes of the wire tool and if its stiffened up a bit (especially if you could put it outside in sunlight or in front of a fan) then it should come off relatively easily.
If the piece is still kind of moist and the place is busy pour a little water in front of the piece and gently push at the base with your fingers it should slide easily and then slide it onto a ware board.
OK, with all the posts combined you should have enough knowledge to make basic rudimentary shapes. So next week we’ll start talking about making bowls.
Till then…get on the wheel and go make something.
Questions on the technique, email me at sparanoarts@gmail.com, like what I’m doing feel free to shop my Etsy store


Comments
4 Responses to “Finishing steps that won’t f%&k up your pot”Trackbacks
Check out what others are saying...[…] promised in last weeks post, this week I will begin moving on to product specific lessons. This week will be bowls. I am going […]
LikeLike
[…] trim up the bottom. You will want to slide down the wall and cut in to continue the curve you’ve […]
LikeLike
[…] to stop. As always, don’t play with it, don’t try and do one more thing. Just stop! Trim the base, cut the bottom with a wire tool and call it a win and go home. Because of the size, I recommend […]
LikeLike
[…] problem in the second video. Why she took the piece of in such a state I have no idea. You should trim your piece up a bit before taking it off the wheel, for no other reason that it sets you up for more success later […]
LikeLike