How to make a bowl, without F%&king up
Hi there, last week I went over typical problems you might have while making your bowls and ways to unfuck them.
Today I am going to walk you through how to make a bowl step by step. Once I am done, you should be able to make bowls with ease, or at least understand how you can begin to make bowls with ease.
Because if there is no problem in the first place then there is nothing that needs to be unfucked!
The tools you’ll need are simple and should be found (for the most) part in a beginner kit.

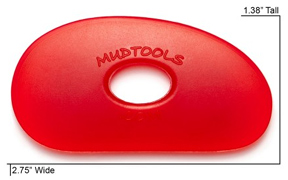
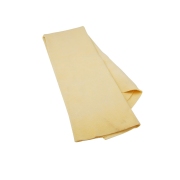
Of the tools you see you’ll need the modeling/wood knife tool, pin tool, wire tool and sponge. I also recommend getting on amazon and buying both a red rubber rib from mudtools and a chamois cloth.
Ok, now on to making the bowls. Let’s say you want to make a standard salad/cereal/ice cream/all purpose family bowl. For that you’ll need to wedge about 2 lbs of clay and also get a ruler.
You’ll want to, of course, center the clay and open it.
Below you’ll also find video of me throwing a bowl from 3 angles so you can visualize the steps better. The video might not correlate perfectly to every step, as I might be making some micro corrections as I threw. If you have any questions, feel free to email me sparanoarts@gmail.com
Now the following instructions are on how to make a U shaped bowl, as well as from the perspective of a right handed person. If you are left handed, just reverse the hand positions unless you are closer to ambidextrous, in which case do what feels comfortable to you.
First, when you open, you want open a little wider than you’re used to. Nothing crazy, but for this bowl we’re shooting for 7 to 7.5 inches wide, so a small opening will not do.
So, now we will throw a wall. It could either be straight up, on a diagonal or with a little be of a curve. It doesn’t matter much, because the first pull usually doesn’t do much to shape an object.
You’ll want to repeat your pull 2 more times. With each pull you want to shape the walls to be a little more rounder. The key is that with each pull, you push out a little, curl your fingers and pull the wall up, but as you get to the top your relax your fingers and make the top quarter of the wall straight.
Now you’re going to want to use your red rubber rib. Hold it in your left hand and have a sponge in the right. Use the rib to throw into the sponge. This will finalize the curve of the bowl. Start at the base, like you normally would and work your way up to the top, as you get to the top you should be barely touching the rim.
After this check the width of the bowl, if you’re in the 7 to 7.5 inch mark, you’re good. If you’re a little shy, give another pull with the rib, but this time with just a little more power in your left.
Once you’ve hit the width. STOP PULLING THE WALL. Don’t go back to do one more thing. Don’t flare the rim. Don’t try and make it perfect.
If I haven’t told you yet or if this is the first blog if mine you’ve read, I’ll tell you now: wheel throwing is your first draft. DO NOT MAKE IT PERFECT. That’s how you fuck things up. You’re just creating a shape that you’ll work with a refine in later process.
So now that you have the shape. It’s time to check the height. We’re shooting for 2.5 inches high. If it’s more than .25 inches short, focus on pulling the wall higher on the quarter of the wall that you left straight. If it is a little too tall, trim it with your pin tool.
After trimming you want to compress and round out the rim using the chamois cloth.
Finally trim up the bottom. You will want to slide down the wall and cut in to continue the curve you’ve created.
YOU’RE DONE!
Pass the wire tool underneath the bowl 3 times and now you have to decide to either take the bowl off the bat or leave it on. If its your personal studio and you have multiple bats, leave it on. If its a communal studio, not busy and you can let it dry for awhile, leave it on. If it is a communal studio and busy as hell, you’ll have to take it off and put it on a ware board.
Next week, I’ll go over the different sizes and shapes of bowls and how to make a V shaped bowl.
Till then, go the studio and make something.
Questions on the technique, email me at sparanoarts@gmail.com, like what I’m doing feel free to shop my Etsy store
Comments
6 Responses to “How to make a bowl, without F%&king up”Trackbacks
Check out what others are saying...-
[…] you have just begun reading the blog, feel free to go back to my later posts on bowl making, unfucking bowl problems, general wheel throwing techniques and the mental game of […]
LikeLike
-
[…] that I’ve discussed how to throw a bowl, its time to talk trimming. In this post I’ll be discussing my method of trimming. Next week, […]
LikeLike
-
[…] that’s done, essentially you throw either a cylinder or a bowl. Its a bit of your choice. Personally, I threw more of a cylinder in the video above. I […]
LikeLike
-
[…] by 3.5 inches tall. Nothing spectacular and if you need a refresher you can always look back on my previous post on bowl making. Now, you don’t need to stick with a round bowl shape for your goblet. You can also do a tall […]
LikeLike


Love the videos, and the music!
LikeLike
Love the videos, and the music!
LikeLike