How to unF%&k your bowls
As promised in last weeks post, this week I will begin moving on to product specific lessons. This week will be bowls. I am going to start not with specific instructions on how to make a bowl, but rather with solutions to problems you may already be having.
Bowls are one of the more intuitive shapes made on the wheel, but that doesn’t mean they are easy.
Most likely if you are having trouble with a bowl there is at least one of these several things that you are doing wrong:
- Letting the centrifugal force of the wheel take over too much.
- Having too narrow a base.
- Over extending too far past the base.
- Relying too much on your fingers.
- Not knowing what kind of bowl you’re making.
First, lets start with the last problem, read an earlier blog of mine about knowing what you want to make. Second decide the shape of the bowl. They break down into two groups, U shaped and V shaped.
This is a U shaped bowl:

This is a V shaped bowl:

See the difference?
If the bowl is meant for salad, soup or tea go U shaped. If its meant for snacks, Asian cuisine, or ice cream go V shaped. Is this a hard and fast rule? Fuck no, but it will at least give you some guidelines until you determine what your rules are.
Next, having too small a base and over extending from your base. These are pretty much the same problem. It will be partially fixed when you know what you want to make. If you are making a V shaped bowl having a small base isn’t terrible because you’ll be throwing your walls on a straight diagonal line wich will keep the walls from going too far past the base and flopping. Resulting in this look:

If you are making a U shaped bowl, simply start with a wider base. You can achieve a wider base in two parts, first centering by pushing down a little more with your top hand thus making the clay a little wider and second in opening the ball of clay. Pull the opening a little wider than you usually would. So if you open to an inch-inch and half, pull to two – two and half inches for a small bowl. Then proceed to pull your walls as you normally would.
A small to average sized bowl that you would eat out of shouldn’t need more than 3 to 4 pulls to get close to size.
OK, now about your fingers…
Too many potters rely on their fingers to do all the work. If you want to create a good looking bowl you’ll need to use ribs, both rubber and wood. I avoid using metal ribs when throwing, as it is too easy to cut yourself with them. Do use your metal ribs in trimming though, they are wonderful for that.
Here is an example of my favorite kind of rib, the red rubber rib from mudtools. I like to have both sizes.
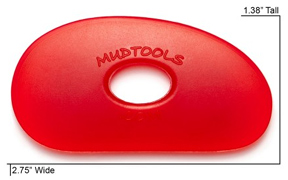
These are great for formalizing the curve of a U shaped bowl. Just throw with the curved side facing out with your left hand and pressed into the inside of the wall of your bowl, while counter balancing with your right hand with a sponge in it. You don’t need a lot of pressure, just let the rib do the work. ***These directions are for a right handed person, if you are left handed reverse the hands****
After which, you can use the straight side in your right hand, bend the rib so it curves and remove all the slip on the outside of the bowl. This will allow the walls to dry faster and be more structurally sound.
There are other colors/levels of plasticity with these ribs. (P.S. I get nothing from the company for recommending them, they really are that good.)
If you are going to be throwing a V shaped bowl, you will need the red rubber rib as well, but before you use it, first you’ll need a wood rib.

Ribs like this are ridiculously common and you were probably given one if you bought a basic tools pack.

For the V shaped bowl, hold the wood rib on the outside of the bowl in the right hand and the diagonal angle you want to bowl to be (45 degrees is pretty good) and throw into the rib, with a sponge in the left hand. Repeat until you are happy the with shape and then finalize the shape/remove slip from the walls with the red rubber rib.
Lastly, giving in too easily to the centrifugal force of the wheel.
As I said above, throwing a small to average sized bowl shouldn’t take more than 3 to 4 pulls. So limit yourself to just that.
But what if its too thick?
That’s what trimming is for!
I’d rather you limit the amount of pulls you make and walk away with a piece and sense of accomplishment than let you over pull, watch it flop and walk away pissed-the-fuck-off. So humor me and do only 3 to 4 pulls. Like I said you can always trim it later.
OK, so next week I will go into specific directions on how to make a U shaped bowl. Until then…
Go make something!
Questions on the technique, email me at sparanoarts@gmail.com, like what I’m doing feel free to shop my Etsy store


Comments
2 Responses to “How to unF%&k your bowls”Trackbacks
Check out what others are saying...[…] Hi there, last week I went over typical problems you might have while making your bowls and ways to unfuck them. […]
LikeLike
[…] you have just begun reading the blog, feel free to go back to my later posts on bowl making, unfucking bowl problems, general wheel throwing techniques and the mental game of […]
LikeLike